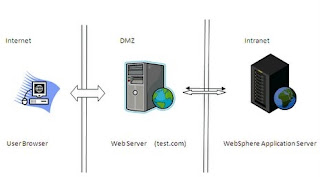
 A wellknown topology for enterprise environment has three main logical zones.
1 Internet or Extranet(User)
2 De militarized Zone (a.k.a DMZ)
3 Intranet
These zones are seperated from each other by establishing firewall .
WebSphere Application server resides in side the intranet zone of company which is mostly secure and and web server resides in DMZ(De militarized Zone ). The internet user can access the application on the WAS only through web server.
The Websphere plug-in residing on the web server is responsible for delivering requests from web server to specific application on Websphere application server.
WebSphere plug-in has a knowledge of the server name and ports on which the the Websphere servers are listening.
The WebSphere plug-in is in memory module which works in sync with Web Server. WebSphere plug-in can be configured by updating plugin-cfg.xml residing on Web Server. Web Server forwards the requests to Websphere plug-in based on the server name and context roots.
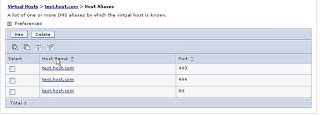
Below suggests the typical configuration required to correctly work the request flow from web server to WAS for host name "test.com" which is listening on port 443,444 and 80 .
Step 1
Define a virtual host stanza in the httpd.conf for Web Server(Apache or IBM HTTP Server) file as below for server name "test.com" which will listen on port 443,444 and 80.
Listen 80
Listen 443
Listen 444
NameVirtualHost 10.12.4.14:443
NameVirtualHost 10.12.4.14:444
NameVirtualHost 10.12.4.14:80
<VirtualHost "10.12.4.14:443">
ServerName test.com
</VirtualHost>
<VirtualHost "10.12.4.14:80">
ServerName test.com
</VirtualHost>
<VirtualHost "10.12.4.14:444">
ServerName test.com
</VirtualHost>
step 2
Corresponding configuration in websphere plug-in config file should be set as below
<VirtualHostGroup Name="tesClusterHost" >
<VirtualHost Name="test.com:80"/>
<VirtualHost Name="test.com:443"/>
<VirtualHost Name="test.com:444"/>
</VirtualHostGroup>
Note: There will be entry per port on which webserver is listening for test.com.
step 3
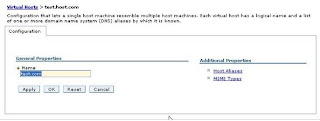
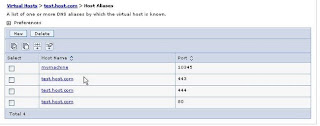
The corresponding setting on Websphere Application Server on Virtual host will be

There will be always a one to one relation ship between port and server name defined in plug-in configuration file to "Host Aliases" defineded in VirtualHosts specific to application server or cluster member.

This completes the sample configuration for test.com
The url to access the was server will be
http://test.com/<context root> (Port 80)
https://test.com/<context root>(Port 443)
http://test.com:444/<context root>
There is a possibility of direct accessing the application on websphere server by passing webserver. But this is only possible in the intranet and based on the settings of the firewall.
If you want access the application directly from WebSphere application server then you can add a new "host alias" with machine name or IP address and port your want listen on like

Then you can access the application directly from the Websphere application server but inside your intranet with url http://mymachine:10345/<application context root>/
NB: Minimize the user of * for defining the virtual hosts because they can very bad effect on forwarding the request and they are not easy to debug.